 |
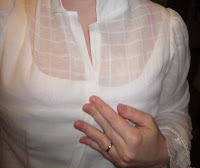
| The Infamous "White Period Dress" Not quite finished, but almost! |
Origins
I couldn't resist- in almost every haunted story there is mention of a woman in "white period dress". They never say which period (which irks my inner historical fashionista), but somehow that explains exactly what the woman is wearing. So, for this late 1890's ensemble, I couldn't resist calling it the "White Period Dress".
The Thimble and I volunteer at an outdoor museum about an hour away where we interpret a mansion built in the 1880's, but staged in the mid 1890's. Last year's outfit included a navy blue skirt, shirtwaist, and corsetlet. This year, I wanted something a little lighter and with less trim, but still pretty. Since I have the "week off" from my job (teacher) for spring break, I wanted to get some serious sewing done. I also had to grade massive amounts of essays and projects, but the fact that I can do that in my p.j.'s still gives me some extra time for other stuff.
So, to rid myself of the bulk essay blues, I acted on a whim and decided to make up this little number.
Materials
I already had the patterns in my box of goodness (TV297 and TV493), and the windowpane cotton was a long ago closeout purchase that was sitting around on the roll and was perfect for this project. All of the undergarments were from last year. Interlining is 5.3 oz linen. Trim was a poly blend (dies) from JoAnn's. I had to act fast and didn't have time to search for antique or comparables.Construction
 |
| The windowpane after interlining was cut away above bust. |

Since I'm terrible at following directions and am not a huge fan of piping, I finished the bodice interior hem with turned twill tape instead of piping. It turned out great and gave me a nice, snug fit over the hips.
The Trimmings
 |
| Close up of the trim and sheer fabric. Two rows of pintucks were added after this picture. |
I utilized the same trim treatment on the sleeves, hem of skirt, collar, and cutaway neckline. I added two rows of pintucks above the bottom trim treatment for two reasons:
 |
| Collar and Cutaway Trim |
2. Pintucks also add some structural support to the hemline by making it slightly stiffer and help the skirts to hold their shape.
The pintucks worked wonders. I don't have the pictures uploaded yet, but the skirt holds its shape so much better now.
End Result
 |
| Back View prior to bodice alteration |
I'm not going to lie, the turn of the century is not my favorite time period. The Belle Epoch and Edwardian fashions, to me, are not the most flattering for my figure (fairly curvy) and out of the 19th century I would have to say that I am madly in love with both bustle periods.... however...
I think I love it! I cannot believe I'm saying this, but it makes me feel like a princess. It's so light and airy. The fabric is so fine and soft and when I walk I can feel it floating behind me like a cloud. The hubby saw it and said that it reminds him of wedding dress (common response actually- I think because it's all white.) But it does make you feel pretty.
And the best part: it has only taken two days of working into the wee hours (so far) to construct. I should have the finishing touches on by tomorrow and it will be ready for volunteering on Saturday, and should make for a much cooler summer season.
 |
| Side View- ignore the sewing mess and iron cord hanging off the ironing table- lol. |
The down side? As Eva (dog #3) has so evidently made clear today- it's white. I've had to wipe off two muddy nose spots so far, which luckily did not stain.
Note to self: Investigate wholesale supply of tide pens...

No comments:
Post a Comment
I would sincerely love to hear your thoughts on all this, so please feel welcome to comment here :-)