Tuesday, May 28, 2013

Un-idle Silence...

So I know I've gone silent for the last month-ish. It's not that I haven't been doing stuff- I have. It's just I have been doing so much stuff I haven't really had time for blogging. I teach high school English as my day job. At certain times of the year it tends to overtake my life; May happens to be one of those times.

Our district lets out the first week of June, so I have been busy grading final essays, assessments, prepping final exams, final reviews, verifying grades, dealing with those last minute panicky students and prom dress alterations... My life becomes pretty well consumed by my job. (For the record, I'm not complaining here. I absolutely love what I do. This is just an inherent part of my responsibilities that causes other things I enjoy to be put on the back burner.)

Anyhow, on the job front we are fast closing in on the end of the academic year (insert sigh of relief here- again...I love my job, but man- you ever feel you need a mental health day...week....okay, month?). On the living history front, we are also fast closing in on Days of Napoleon- EEK!

Not only am I attempting a modified tent framework (I'm modding the concepts we have currently to make it  a more girl set up friendly- 6 foot tall man I am not!) but I'm also attempting to create roughly four wardrobes for our group members to be outfitted for the appropriate time period for this event. Sometimes... I think I take on too much. But don't tell anyone else I said that. Seriously.

My HSF challenges have been somewhat put on hold until I get a handle on everything else, but no worries! I have been trying to remember to take pictures as I work on things so that I can post them later. On that note, here's a sneak peak at my latest DON piece:

Eyelets on my new 1812 corset. My all hand sewn original that you saw on
Maybelle has been gifted to my best friend Alix for Days of Napoleon. =)
And yea... that is some machine stitch you see. While my first 1812 corset was entirely hand stitched, I just do not have the time to replicate the process. I'm in survival mode as this point. I need to get everyone at least one set of wearable appropriate clothing. Then I can start supplementing/replacing/remaking everything by hand. This is a whole new era for us, so I'm building from the undergarments out. To compromise between necessity and my own personal standards, I'm not compromising on the construction (i.e.if using the machine means I would have to update the garment construction technique, then I will hand sew instead)  and I will only use the machine on seams that will not be seen by the public (so no hems, top stitching, etc.).

Would I love to have the time to be better than this? Yes. Am I going to stress out and pull all nighter sew-a-thons for the next two weeks? No. Ultimately, will I remake things the in best way I know? Yes. Do I care if some pretentious prig comments on the unseen machine stitching hidden in my petticoat side seam? No.

Okay, honestly ...it will probably make me a little irate. But only because I think as a living history community we need to be better at supporting each other instead of cutting each other down. But that's a story for another day. We've a storm on the way and I have procrastinating grading essays long enough.

I just wanted you to know that I am alive and as verbose as ever. You know, for the four people that actually read this thing. =P

Right. Back to papers.


Tuesday, April 16, 2013

Random update on stays, shifts, etc.

I may have been neglecting blogging this last week, but I have not been neglecting sewing! I have all of this week off for spring break and I have big plans for myself.

Instead of posting a new post for each thing, I've just decided to update all in one fell swoop.

Cheater stays- almost to the finish line! It is somewhat tedious soaking, shaving, sanding, and shaping all of that oak splint to fit, but I'm about halfway there. Then I just have to cut the last few center and center back bones out of metal to give a little extra support, lop off the excess with a chisel, and let loose the binding/lining.

I'm also working on a couple of shifts for myself and a dear friend. I'll be making one for each of us suitable to the 1770's, then another one for myself to fit my 1812/Regency wear. She came down and visited Sunday so that we could make a muslin to test the fit of the neckline and check the cut of the shift (while a loose and not really tailored garment to begin with, I like to verify before cutting into linen- especially the neckline!)

We had a blast and got her shift pattern satisfactorily made up so that she can make more of them when the fancy strikes later.

I've used a combination of sources for the drafting of this shift. I've been heavily influenced by Sharon Burnston's article on shifts, but have also utilized Mara Riley's instructions. Now add in searching collections with shifts that I am able to view online (no museums nearby with suitable pieces for study and no time to attempt a quick trip!) and my own personal library of costume history literature.

Here's a glimpse of the patterning stage: (I usually just measure directly on the fabric, but wanted to have a paper pattern to make neckline alterations on so that I could send it home with my friend so she could use it for as many shifts as she wants!)


I'll have more details on construction method and choices (always seems to be some compromise when you're adapting modern materials to historical garments- particularly with shifts...) but for now.... back to shaving oak splint!

Sunday, April 7, 2013

HSF Challenge #7: Accessorize (or an 1812 workaday apron)

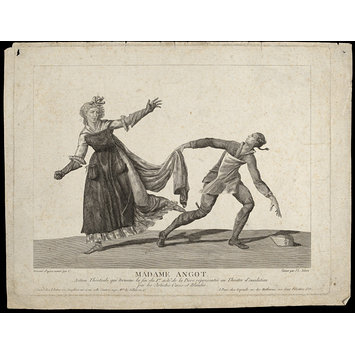
While dating to 1797 and a scene from
an opera,this style of apron is what I was
 hoping to imitate. See below.
What girl doesn't love accessories? I, personally, am a scarf girl in my 21st century life. I have scarves of all colors, shapes (sort of- only so many shapes out of which you can make a scarf!), and sizes. This does not translate into my historical selves, however. I am not a crazy neck handkerchief hoarder or anything like that.

I am, however, beginning a love affair with the apron (which, btw, is translating into my 21st century self... why did these things go to the wayside??).

For this challenge, I opted for an 1812 working apron. It's one of my items on my long list of to-do's for an event we're attending in June. While it is a working apron, not a "dressy won't get messy" apron, I think it still qualifies for the accessory category- so here it is:


The Challenge: #7-Accessories
This was more of
the style I was hoping for.
Fabric: 1.5 yd 60'' wide linen/cotton blend. Natural color with a small blue woven stripe. Picked this fabric up in a family owned Michigan fabric store for $10 yd.
Pattern: None. Draped to form based on contemporary examples in print and artifacts.
Year: 1812-ish
Notions: natural linen thread,  two wooden button molds
How historically accurate is it? Well, pretty accurate ( I think.) Basically, all hand sewn with historical techniques. Warning: Read on only if you really want to know the specifics! You may think I'm crazy- but I probably spent more time researching this piece as I did actually sewing it. I really wanted an apron with a bib, mainly because this is going to be for our cook and I wanted something to cover more of  her gown. I wasn't too keen on the idea of making a smock, though. It just wasn't as pretty.

So, to my historical textile books I went. I found an example of an apron in a print similar to what I was wanting on page 144 of Napoleon and the Empire of Fashion.  After turning up nothing else of note from my print sources, I then turned to any web sources that might be available.
This plate from the Missouri History Museum
shows more of the style of apron I was
going for- similar to the one in Empireof Fashion. 
This plate from the V&A shows stripe
similir to mine, so I feel good
about the fabric choice.


There were a number of other plates with your standard bib-less aprons (one even sporting an awesome cross barred design) in a variety of colors. Buttoning seems to be a pretty common closure for this period in aprons. Now, note on this- I haven't seen any early 19th century aprons in person. I did browse online collections and found a few that look consistent with the period's silhouette and they have a variety of closures on the back. There is this painting which also shows what appears to be a non tie closure on the back of a dark (and looks bibbed) apron. (Although, it appears there are possibly two versions of this? Hmmm...)

Anyhow, my finished version looks something like this:
Front                                  Side

Hours to complete: Not counting research, maybe eight or ten hours? I basically spent two hours or so fiddling with it on Maybelle to get it how I wanted it, then maybe another six or so actually sewing it together.

For future reference,  I have decided to download an app so that I can track my hours on various projects more accurately. Especially as I'm going to be doing more of these challenges! 
First worn: Will be worn in June at Days of Napoleon in Belvidere.
Total cost: $18

And.... here are a few more pictures of construction, etc. for your viewing pleasure!

I started with a rectangle of fabric for the bib, then moved to the band. You can see
where I ended up piecing the band in places as I wanted to conserve fabric.

I then attached the skirt of the apron, trying a couple of different pleat placements until I was happy. Next, I attached the over the should strap and adjusted placement of this strap in conjunction with the bib for a look I liked. 

Once I was done fiddling with everything, I took it all apart and started to sew the pieces together.  I used a backstitch to sewing the skirt to the band to make sure everything stays securely in place.

Finished view of the side and back. I have not put the buttons/buttonholes on yet as I have not put this on our cook.
She is very close to the same size as I am, but I'd like to put the finishing touches on when we put it on her so it
will be a more precise fit. 


Close up of the top stitching on the band (spaced back stitch) and the hem. 

Overall, I'm happy with the final product. I might try to do more of a smock style for one of our members who portrays a kitchen maid, but we'll see what I find as I turn up more research.

Now, to prepare for challenges #9, 10, 11, and 13! (I'm skipping #8. #12 is pending further review of my time commitments for the other four...)

I have big plans a brewing, so I guess I'd better get to sewing.

Happy sewing and happy Sunday!

Wednesday, April 3, 2013

A Little Bit of Twain and Turn of the Century

Saturday evening a few of us drove out to Bella's Food and Spirits to spend an evening with Mr. Twain (who was tending bar) for a fundraiser for veterans. We enjoyed a lovely dinner, and the best part was that we got to get out our much less frequently visited late-Victorian wardrobes for the night. I dressed up the "White Period Dress" with a lovely red velvet belt with a pearl accent (I saw this in a photograph from the period... I'll post an update when I find the original!); Alix wore the blue wool with a new ribbon around the waist to gussy it up a bit.

It was a lovely evening, and even though we didn't get home until the wee morning hours, it was totally worth the drive.
Myself, Mr. Twain, and Alix getting some fresh air on the
back patio.

Sunday, March 31, 2013

Easter on the Range

Happy Easter, dearest reader, and hopefully you are able to enjoy the company of beloved family and friends.

This morning, my husband treated us to some lovely time at the range. A few months ago, he gifted me with my first single action pistol: an 1858 Remington New Model Army. I have been checking out SASS for a little while now. Honestly, my interest in SASS started due to two things: My desire for some late Victorian (specifically bustle/grand bustle period) clothes and the lack of places to wear them. It's not that I don't enjoy shooting, because I actually do. But my obsession love of historical fashions has me lusting after hoping to round out my historical closet with something from this awesomely sexy femininely flattering time period.

I got to fire my revolver for the first time today, and I must say it was quite fun. My favorite target was a steel plate bunny. (It didn't hit me that this was sort of humorous in a mildly dark kind of way...)  I made him spin once or twice and rocked him back and forth a number of times. Overall, a successful day on the range. (Of course, the rest of the day we spent time with both of our families for two wonderfully filling and delicious suppers!) Here are a couple of pictures of our morning:


Firing my new revolver. It's a bit mushy out with the thaw
happening, so I wore my new rainboots, too! I like to think
that between my boots and my vest I was not only
putting fashion first, but SAFETY!


The hubby firing his new brown bess. She's pretty =)

Friday, March 29, 2013

Dress Form (1812 Style)- Part 3: The End... sort of

A little while ago I started the process to create my very own custom made plaster cast dress form.... in my 1812 undergarments.

Let me say... it has been a journey!
Left: sealed mold on old dress form. Right: form upside
down, supported by paint cans and ready to fill.

Last week, I prepped my mold by coating it in Johnson's Paste Wax and a mold release agent. I was using an old display mannequin to mount my new form on on, so I put my plaster mold onto the old form and sealed the sides with plaster strips. I also sealed the neck..

After 30-45 minutes, I tipped everything upside down (supported it by three paint cans) and got ready to pour. 

Whoops! I ran out of foam!
Lo and behold... I got to the end of my foam before I got the bottom of my form. Uhg!  I would have to order more foam. It was a Friday night, of course, so I wouldn't be able to get the foam asap, but I hopped online to the Brick in the Yard store to order some more--in bulk this time. (It got here Wednesday, BTW.) While I was there I picked up some more plaster bandages for my next venture. I was worried that this might make it more difficult to get my form out of the mold later, but c'est la vie!


The shoulder where I started
pulling off plaster bits until
my fingers were sore! 
I got to work last night to finish up. It actually wasn't as bad as I thought... The only really bad part was I think I overdid the plaster bandages on the sides of the cast, because WOW! I could not get those suckers to peel off as nicely as they should have. No worries, though. I just chipped off pieces of the cast as I could. It wasn't stuck to the mold, but that plaster sure was strong!

Foam form- post plaster
removal.
 Once all of the plaster came off (and I had a mess of plaster pieces on my floor) I was left with the semi-finished form. I would need to shave off a little bit of the foam to be able to put my undergarments on underneath gowns I am draping (since I was wearing the undergarments for shape when I cast the mold.) I just needed to figure out how much.

I grabbed my regency corset and a knife and went to work slicing away unnecessary bits of foam. At about midnight, I was sore, tired, and beginning to loose hope that I would be able to make this work. Boobs were still too stiff (even with the soft foam) and I couldn't get the gap in the back down to the 2 inches or so I have when I lace...

Please tell me this was not for nothing!!!

At this point, I decided what I needed was some rest and recuperation. I went to bed. I awoke this morning still fretting over what to do with Maybelle (it's official...she has been named...).

I tossed and turned, trying to sleep some more but also thinking about the fate of this form. I finally decided to just get up, go downstairs, and attack her with new vigor.

I came downstairs; I hacked at her rib cage a bit more (the one place that she still was not quite the right size) and fretted over the shape of her bubbies (which still wasn't quite the right shape). Then, I vaguely recalled reading a post about using some sort of bean and pantyhose to make a fake breast for your dress form. Save me bean boobies!!

My lentil filled knee high. AKA Maybelle's new boobies!

I found the original post by American Duchess and off to the grocery store I went. I returned with a ten pack of knee highs, four  bags of lentils, deodorant, extra sharp cheddar cheese, and milk. Don't judge.

When I got home, I put the cheese and milk in the fridge and put some lentils in my knee highs. ( I left the deodorant in the bag, in case you are wondering... I'm going to use that later...)

I hacked off Maybelle's foam assests and gave her new (and natural) replacements! And voila... It worked!

Left: Maybelle   Right: Me.
These bean boobs are pretty cool. You can mush them around in the cup to pad it out like your own do. I did have to play around with how much to fill the knee high but with minimal fuss Maybelle had pretty close replicas of my own endowments.

Left: Maybelle   Right: Me
 This also helped to fix my problem with the back gap not closing enough.

Right now, Maybelle is not very pretty. She has at least two different colors of foam and no cover. I do plan on shaving her down a bit more so that I can apply some batting and a classy cover. I think I am going to leave her beanie boobies free floating rather than integrating them into the form, though - less work that way.

However, while she may not be her prettiest at the moment, she is certainly pretty close to functional. Which means once I check her measurements to mine one last time I can finally start that Regency wardrobe I need so badly for June! Eek!


Cheater Stays- Progress!


My tools laid out and ready to rumble!
Well, while I was working on Maybelle Thursday night, I had some down time while I was waiting for the foam to cure. So, what better to do than work on my 18th century (cheater) stays! My oak splint arrived awhile ago, and it's just been sitting there in the box patiently waiting its turn. I finished hand sewing my stay panels together Wednesday night and was feeling up to the challenge of tackling the oak splint.


I got my bucket of hot water to soak the oak (about 10 minutes according to the directions) and then gathered everything else I might need. Then I turned on my DVR and got to work.

Scraping the oak wasn't as bad as I thought it would be. My hubby sharpened my knives for me so that they had a good edge which made the work a lot easier. I did a few test strips and kind of got the hang of it.
Cutting the damp oak to width.


I even attempted a few shaped channels where I cut the oak to fit a point and curve so that it filled the channel entirely. It was actually sort of relaxing in a strange way. Of course, at this point I was in the middle of the Maybelle fiasco, so maybe that's why it seemed so methodically calming!

So far so good. Once I finish inserting the oak I can bind the stays and attempt a 1760's dress form... yay...