Showing posts with label Historical Sew Fortnightly. Show all posts

Thursday, January 1, 2015

"The Object of the New Year..." or 2014 in Review and 2015 in Hopefullness

...is not that we should have a new year. It is that we should have a new soul and a new nose; new feet, a new backbone, new ears, and new eyes. Unless a particular man made New Year resolutions, he would make no resolutions. Unless a man starts afresh about things, he will certainly do nothing effective.

While 2014 has had its challenges and set backs, it has also had its beautiful moments and encouragements. It was a year like so many others, with its firsts and lasts, its pros and cons. I am proud of the fact that I had twice as many posts as I did the year before. I may not post ultra regularly, but it is a habit which I am making more habitual. 

I'm not really one for resolutions, but the new year does provide a rather convenient time to think about potential opportunities for improvement and positive change. It's also a nice time to look to what is ahead (or what could be ahead, if you want it to be.)  

For my own part, I am excited for so many good things ahead which seem to be coming to fruition in 2015. After being closed for near half of the school year for sorely needed renovations, my library has its grand re-opening next Monday. While it made it unmanageable for my husband and I to attend New Orleans or Waterloo this year, my graduate school program will be wrapping up soon (pending my decision as to which certificates I want to pursue) and my husband has declared a major of study in which he is very happy. 

Sewing wise, my historical arena is being broadened as I tackle two new eras in clothing this year.(Yikes! In conjunction with all of my other sewing for the 18th century, now I'm adding 16th century for my high school's madrigal program and 1830s/40s for a local historical site!) So much sewing in my future. 

I'm also doing some things for myself this year. I want to be better about holding myself accountable and (as cheesy as it sounds) being more like Christ. I want to be able to speak truth but with more grace. I want to cultivate humility.

I also have a list a mile high of projects for this year. I know I probably won't get them all done, but I also know that lists help me organize myself and give me a record of what my ideal outcome would be. I'd also like to participate as much as possible in the Dreamstress' Historical Sew Monthly. My goal? Probably to get half of these actually finished. So here are some things you might see from me in 2015:

     ~ [Finally finished] Italian Gown
     ~ Duchess of Gordon Polonaise
     ~ New Small Clothes for the Nate
     ~ New Regimental for Nate's 18 c. 4th Foot grenadier uniform (HSM April)
     ~ 1840s undergarments (corset, corded petticoat, shift) (HSM June)
     ~ 1780s stays (new pair)
     ~ 1760s stays (new pair) (HSM January) 
     ~ 16th century kirtle and smock (still need to determine decade)
     ~ Nate's 18th c. sailor getup 
     ~ Baby clothes for Cora (my new niece! She's super cute!) 
     ~ 18th c caps (HSM March)
     ~ Wider range of 18th c. hair rollers/pads (HSM March)
     ~ 18th c Mitts for summer and winter (HSM July)
     ~ Finish 18th c ruffled apron (HSM July)
     ~ Finish 18th c ruffled petticoat to go with Italian gown

Other stuff may pop up, too, but I'm really hoping to start knocking some of these things off of my list before adding too much more. A girl can dream, eh?

Tuesday, April 16, 2013

Random update on stays, shifts, etc.

I may have been neglecting blogging this last week, but I have not been neglecting sewing! I have all of this week off for spring break and I have big plans for myself.

Instead of posting a new post for each thing, I've just decided to update all in one fell swoop.

Cheater stays- almost to the finish line! It is somewhat tedious soaking, shaving, sanding, and shaping all of that oak splint to fit, but I'm about halfway there. Then I just have to cut the last few center and center back bones out of metal to give a little extra support, lop off the excess with a chisel, and let loose the binding/lining.

I'm also working on a couple of shifts for myself and a dear friend. I'll be making one for each of us suitable to the 1770's, then another one for myself to fit my 1812/Regency wear. She came down and visited Sunday so that we could make a muslin to test the fit of the neckline and check the cut of the shift (while a loose and not really tailored garment to begin with, I like to verify before cutting into linen- especially the neckline!)

We had a blast and got her shift pattern satisfactorily made up so that she can make more of them when the fancy strikes later.

I've used a combination of sources for the drafting of this shift. I've been heavily influenced by Sharon Burnston's article on shifts, but have also utilized Mara Riley's instructions. Now add in searching collections with shifts that I am able to view online (no museums nearby with suitable pieces for study and no time to attempt a quick trip!) and my own personal library of costume history literature.

Here's a glimpse of the patterning stage: (I usually just measure directly on the fabric, but wanted to have a paper pattern to make neckline alterations on so that I could send it home with my friend so she could use it for as many shifts as she wants!)


I'll have more details on construction method and choices (always seems to be some compromise when you're adapting modern materials to historical garments- particularly with shifts...) but for now.... back to shaving oak splint!

Sunday, April 7, 2013

HSF Challenge #7: Accessorize (or an 1812 workaday apron)

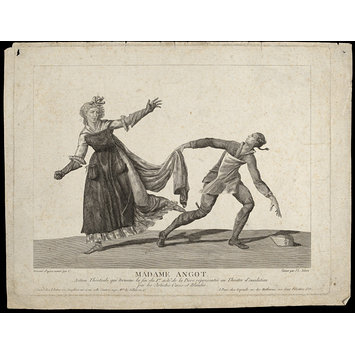
While dating to 1797 and a scene from
an opera,this style of apron is what I was
 hoping to imitate. See below.
What girl doesn't love accessories? I, personally, am a scarf girl in my 21st century life. I have scarves of all colors, shapes (sort of- only so many shapes out of which you can make a scarf!), and sizes. This does not translate into my historical selves, however. I am not a crazy neck handkerchief hoarder or anything like that.

I am, however, beginning a love affair with the apron (which, btw, is translating into my 21st century self... why did these things go to the wayside??).

For this challenge, I opted for an 1812 working apron. It's one of my items on my long list of to-do's for an event we're attending in June. While it is a working apron, not a "dressy won't get messy" apron, I think it still qualifies for the accessory category- so here it is:


The Challenge: #7-Accessories
This was more of
the style I was hoping for.
Fabric: 1.5 yd 60'' wide linen/cotton blend. Natural color with a small blue woven stripe. Picked this fabric up in a family owned Michigan fabric store for $10 yd.
Pattern: None. Draped to form based on contemporary examples in print and artifacts.
Year: 1812-ish
Notions: natural linen thread,  two wooden button molds
How historically accurate is it? Well, pretty accurate ( I think.) Basically, all hand sewn with historical techniques. Warning: Read on only if you really want to know the specifics! You may think I'm crazy- but I probably spent more time researching this piece as I did actually sewing it. I really wanted an apron with a bib, mainly because this is going to be for our cook and I wanted something to cover more of  her gown. I wasn't too keen on the idea of making a smock, though. It just wasn't as pretty.

So, to my historical textile books I went. I found an example of an apron in a print similar to what I was wanting on page 144 of Napoleon and the Empire of Fashion.  After turning up nothing else of note from my print sources, I then turned to any web sources that might be available.
This plate from the Missouri History Museum
shows more of the style of apron I was
going for- similar to the one in Empireof Fashion. 
This plate from the V&A shows stripe
similir to mine, so I feel good
about the fabric choice.


There were a number of other plates with your standard bib-less aprons (one even sporting an awesome cross barred design) in a variety of colors. Buttoning seems to be a pretty common closure for this period in aprons. Now, note on this- I haven't seen any early 19th century aprons in person. I did browse online collections and found a few that look consistent with the period's silhouette and they have a variety of closures on the back. There is this painting which also shows what appears to be a non tie closure on the back of a dark (and looks bibbed) apron. (Although, it appears there are possibly two versions of this? Hmmm...)

Anyhow, my finished version looks something like this:
Front                                  Side

Hours to complete: Not counting research, maybe eight or ten hours? I basically spent two hours or so fiddling with it on Maybelle to get it how I wanted it, then maybe another six or so actually sewing it together.

For future reference,  I have decided to download an app so that I can track my hours on various projects more accurately. Especially as I'm going to be doing more of these challenges! 
First worn: Will be worn in June at Days of Napoleon in Belvidere.
Total cost: $18

And.... here are a few more pictures of construction, etc. for your viewing pleasure!

I started with a rectangle of fabric for the bib, then moved to the band. You can see
where I ended up piecing the band in places as I wanted to conserve fabric.

I then attached the skirt of the apron, trying a couple of different pleat placements until I was happy. Next, I attached the over the should strap and adjusted placement of this strap in conjunction with the bib for a look I liked. 

Once I was done fiddling with everything, I took it all apart and started to sew the pieces together.  I used a backstitch to sewing the skirt to the band to make sure everything stays securely in place.

Finished view of the side and back. I have not put the buttons/buttonholes on yet as I have not put this on our cook.
She is very close to the same size as I am, but I'd like to put the finishing touches on when we put it on her so it
will be a more precise fit. 


Close up of the top stitching on the band (spaced back stitch) and the hem. 

Overall, I'm happy with the final product. I might try to do more of a smock style for one of our members who portrays a kitchen maid, but we'll see what I find as I turn up more research.

Now, to prepare for challenges #9, 10, 11, and 13! (I'm skipping #8. #12 is pending further review of my time commitments for the other four...)

I have big plans a brewing, so I guess I'd better get to sewing.

Happy sewing and happy Sunday!

Monday, March 25, 2013

Historical Sew Fortnightly- Challenge #6: Stripes (or an 18th century striped petticoat)

Not the best photo of me, but you can see my
striped petticoat peeking out from (you guessed
it!) my semi-sheer striped cotton apron.

Well, this was my first challenge that I've done from the Historical Sew Fortnightly hosted by the Dreamstress on her blog. I was a little nervous (as I'm terrible with deadlines not associated with work!) but I thought I would pick a few challenges to try to keep me on track while working on my historical wardrobe this year. To the detriment of my non-stripe-loving-husband, I knew that this challenge was for me! 
This was my first all hand sewn (not just hand finished) petticoat. I am pleased with the results, and will only get better with time!

So, here she is... my sturdy, but lovely, new striped petticoat. All by hand-I'm slowly replacing everything I have made over the years with hand sewn period methods. 


 The Challenge: Stripes (read the original challenge here!)
Fabric: 2.5 yds lavender/white striped linen (maybe linen/cotton blend- I can't rightly remember, but certainly one of the two.)
Pattern: no pattern, per say. Made the way I make all of my 18th c. petticoats: Sew the panels together, cut pocket slits, hem, and then pleat to tape/waistband. Tadaa!
Year: 1768(ish) but can be worn for most of the 18th c.
Notions: 3yds or so of tape for waistband.
How historically accurate is it? As accurate as I know how to make it... It's entirely hand sewn, with a small hem and pleated to waist tapes. My pleats ended up a little smaller than I had planned, but it was so much easier to pleat using the stripes I couldn't help myself.
Top Left: Right side view of the hem. Top Left: underside of the hem.
Bottom: petticoat pleated to waistband tapes. 
Hours to complete: Hmmm.... 4 or so? I kind of spaced it out here or there. (I take a project bag with me everywhere so when I have down time I stitch a bit. But that sounds about right.
First worn: Timeline Trading Day at Midway Village in January (not all the way completed! eek!) First worn finished at Military History Fest in February. (It was my first challenge and I wanted to make sure I would be able to get it done in time!! March is the end of the quarter at the high school where I teach, so I wanted to be extra safe on the deadline. lol)
Total cost: Around $30. (I made one the first time out of only two yards and it ended up being too short after washing... so I gave it to my BFF. I got some more of the fabric for a second, longer version at $12 or thereabouts.)