Monday, June 13, 2011

Marseilles Under-petticoat

As promised, this is an update of the sew-a-thon prior to Macktown. I completed many, many things in a very short period of time, and just haven't put them up yet. So, here is the under-petticoat I made to try to help keep me warm and add some puff without the weight.

It was put together fairly quickly, and because of that has one or two areas with some cosmetic flaws that do not affect the functionality. It is shown to the left with over a false rump with an apron over it and to the right without apron.

Construction was fairly straightforward, much like a normal petticoat, but I documented it below if you're interested.


I used a loom quilted Marseilles (diaper cloth) from from 96 District Storehouse. It is very reasonably priced at $5 per yard and we have always had great service.

Since this was going to be an underpetticoat, I cut two 30'' lengths off of my yardage. I took the two pieces and sewed them together up the side seams.


Now, here I deviate a bit from a regular petticoat. Because I am only using this as an underpetticoat, I sewed one side all the way up to the top, and left an 8'' slit from the top open on the other side.Thus my petticoat ties on the side. This will alleviate the bulkiness of the petticoat overlapping at the sides and  of my ties being all in the front. My pocket will be worn between this petticoat and the one on top of it, so the side slit is only to put the petticoat on and will not function as a pocket slit.

Next, was to pleat the petticoat down to my waistband. As you can see below, I started by pinning the petticoat to my big ironing table at the center. I then used my lines to make pleats that mirror each other radiating from center. You can't see it in the pictures, but I actually used my chalk to mark where the waistband would start and stop so I would know how much to pleat down. I'm not a mathematical pleater on a good day. I like to use my intuitive sense of pleating to tell me when to overlap pleats or not,but I admit to usually sitting down and figuring out with my formula how big each pleat should be and how much to overlap so that they all look pretty and even . I just didn't have that much time this go-around, so I relied on my special powers instead.


After finishing one side of pleating (see right), I continued to pleat the other side using the same method. The only difference this time was since I was pleating the front, I left a three inch flat portion in the center before I started the pleats so that I don't get a poofy belly look. I like to look nice in period clothes, not preggers. =P


I measured a piece of twill tape  by wrapping around my waist the desired number of times, tying, and cutting ends. Taking what I wanted to be the right side of the twill tape, I put that on the right side of the petticoat, aligning it so that when I flipped the tape back it would reach to cover the raw edge and sewed it down.

I turned the tape back, ironed  flat and sewed another line holding the bottom edge of the tape to the petticoat, encasing the raw edges of the pleats within the tape.  Finished front waistband at right.

I wore the petticoat all weekend at Macktown, and the only thing I noticed was how much shorter it made my other petticoats. I anticipated it lifting my hem, but didn't think it would lift quite so much (about two inches.) I'll need to start making my petticoats longer because I felt a little French!

Sunday, May 29, 2011

Ahhh.... the end of the school year, the beginnings of the hoop skirt...

So, next week is the last few days of our school year, meaning I will have a little more free time on my hands to sew =)  The materials came in today for my 1856 walking cage crinoline (I'm using TV142 as the base). I've already decided to make some minor alterations because a) school isn't over yet- so I'm still slightly crunched for time, but want to start making it now since everything is here! and b) I'm lazy right now and feel like taking shortcuts.

So deal.

Anyway, I've got the hoop boning in, the hoop casing, and the fabric ready to go. I've cut the bone casing (took about five min.), and just need to cut the twill tape verticle strips and the bottom bag and waistband and then we are ready to go. I'm trying to time myself on this to see how many hours I'll need to add in when I make these for the business. I'm hoping not a ton, since the cost of materials alone (if you get good stuff) is fairly high. But, I refuse to go the "four bone Civil War hoop skirt" route. I want a nice, well shaped hoop that will look elegant and authentic. I refuse to make the same obvious mistakes with new time period that I did when I was a noob to the 18th century. I have lived, learned, and hopefully can now apply it...

P.S. Pictures coming soon!

P.P.S. Should also have updates on stomacher front stays and our other pieces from the 18th century kit soon with pictures also! Yay summer!

Saturday, April 23, 2011

A disaster of magnificent proportion (or so much to sew, so little time...)

Okay, some time back at the end of the last event season, my dutiful husband thought to show his love and affection by washing our event clothes. Sweet, right? Until he switched loads, and then came upstairs to tell me, "Umm... so there was a little bit of a problem..."

He had basically washed everything that would fit into one load (thinking to economize on water/detergent/energy, I understand this since I am constantly reminding him to only run full loads on regular laundry to be a good environmental steward) and happened to put my brand new red wool riding habit, his brand new black wool sleeved waistcoat, my fine bleached linen apron, etc. all in the hot/cold setting (well, they were pretty dirty, he says.)

So, after a lovely cycle in the wash the red and black wool bled over everything, making my linen apron tie dye (not to mention the shifts, shirts, and underpetticoats in there!) and shrunk to high heaven, leaving us with very few items left unscathed.

I cried. I didn't mean to, but I couldn't help it. Apart from stockings and shoes I have made every single historical garment that we own and while I machine many seams, the hand sewing time from finishing alone made me weep. Now, I knew in November that I would need to replace each item by April 30th. However, I teach during the year and time is scarce.

April 30th is fast approaching, and I have been sewing like a madwoman, but I still feel like I'm so behind schedule. I've finished a serviceable apron, a false rump, an almost finished apron, one and a half shifts, half a quilted underpetticoat, and the channels on 2/3rds of my stays so far.

I have gotten cut and ready to sew: one man's shirt, one boy's shirt, three wool petticoats, and one girl's shift.

I have fabric washed and ironed for: one linen petticoat, one linen gown, one linen jacket, and two caps.

I have fabric bought and waiting for: one linen petticoat, one linen bed jacket, one shift, two pairs of boy's fall front breeches, one pair cream wool man's fall front breeches, one hunter green waistcoat, one chocolate brown man's frock coat, and Good Lord, please let me now be forgetting anything.

All to be done (we hope) by April 30th. This isn't all for me, mind you. I'm sewing for myself, my husband, my sister, and two friends and their two chidlren. I obviously won't be able to post pics until after next weekend, but I hope to update when I'm taking a break (such as now) from my forced slave labor. =)

Tuesday, April 5, 2011

The White Period Dress at the Museum

So, Alix and I went to the museum Saturday for a lovely day of volunteering at the Mansion. Our morning was a little slow on tours, so when we had an empty tour slot we went outside to get a photo of the dress in use =)

It was very comfy to wear, and we really liked that we were representing two very different, but common, styles of the period (Alix in a shirtwaist and skirt, myself in a day gown). We had a lot of compliments from patrons on the clothing, which was cool. We also has some cool new toys to play with in the Mansion, which I think gave us a whole new level to add to the tour, since now there were things people could actually hold/touch.

After the tour day was over, we visited our good friends at Spring Valley Lodges on our way home to peek at a few treadle machines Jim had. Overall, a good day.


The White Period Dress on the side porch of the Mansion.
 It was a beautifully sunny morning!


Trying to look stern like a Victorian. Didn't work =/

You down with DPP?

The Double Period Project- oooh... should I?

So, I joined YWU/FR today (I think I'm addicted- I also joined ALFHAM earlier this week) and I happened across the Double Period Project. (See above link for description of contest.) I've been meaning to make a Regency kit for some time now, and there are a few events in the area that are 1812 events... so I'm wondering if this might not be the kick in the butt that I need to get some 1812 clothing in my wardrobe.

I haven't started looking at plates yet for inspiration, but I already can tell you that if I do this I'll be going for historical accuracy more so than "inspired by". Ah, how I wish I was able to costume all of the time.

Friday, April 1, 2011

Sources, Please?

Looking for sources for 18th c. (1760-70's primarily) inns/public houses. Have a few, but want some more to compare/contrast. Getting "the Inn" as a physical space ready and need to start digging deeper for the atmosphere. Any suggestions?

The White Period Dress

The Infamous "White Period Dress" Not quite finished, but almost!
Origins

I couldn't resist- in almost every haunted story there is mention of a woman in "white period dress". They never say which period (which irks my inner historical fashionista), but somehow that explains exactly what the woman is wearing. So, for this late 1890's ensemble, I couldn't resist calling it the "White Period Dress".

The Thimble and I volunteer at an outdoor museum about an hour away where we interpret a mansion built in the 1880's, but staged in the mid 1890's. Last year's outfit included a navy blue skirt, shirtwaist, and corsetlet. This year, I wanted something a little lighter and with less trim, but still pretty. Since I have the "week off" from my job (teacher) for spring break, I wanted to get some serious sewing done. I also had to grade massive amounts of essays and projects, but the fact that I can do that in my p.j.'s still gives me some extra time for other stuff.

So, to rid myself of the bulk essay blues, I acted on a whim and decided to make up this little number.


Materials

I already had the patterns in my box of goodness (TV297 and TV493), and the windowpane cotton was a long ago closeout purchase that was sitting around on the roll and was perfect for this project. All of the undergarments were from last year. Interlining is 5.3 oz linen. Trim was a poly blend (dies) from JoAnn's. I had to act fast and didn't have time to search for antique or comparables.


Construction

Cutting actually didn't take that long. We had the pattern pieces for the skirt already cut on our heavy duty brown pattern paper and the windowpane cotton was so thin ironing was a breeze. This was my second time on this skirt, and it went together in about two-three hours. No snags. Love this pattern. I did have to add an extra flounce to my petticoat to help support the windowpane. It didn't really have the body needed to hold itself up, so to speak. I am considering a regency gown with this material at a later date. I think it would lend itself very well to that period.

The windowpane after interlining
was cut away above bust.
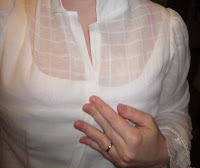
The bodice was a new one for me, but again- went together super easily. The only part that got me was I decided to cut away some of the interlining to display the windowpane pattern better across the top of the bosom. This was a little difficult to do considering that I had to lace myself into my corset without assistance in order to determine where to cut away the interlining. In the end, with some pins, chalk, and a mirror, I ended up with an even and modest peek-a-boo effect. I have yet to attach my closures on the bodice and still need to do a few tweaks on the front darts (that pesky hourglass silhouette!) but everything else is finished.


Since I'm terrible at following directions and am not a huge fan of piping, I finished the bodice interior hem with turned twill tape instead of piping. It turned out great and gave me a nice, snug fit over the hips.


The Trimmings

Close up of the trim and
sheer fabric. Two rows of pintucks
were added after this picture.
I think the best part was this time I only had to apply 15 yards of trim for the whole kit, as compared to the last time I when I applied over 20yds of trim to the skirt alone! But the fabric was so delicate I didn't want to overburden it with yards of junk. I already had to compromise on the trim being a poly blend due to the unplanned nature of the thing as it was. I could not and would not add to that by going over the top with a poly-lace extravaganza that would rival a pop star in the 80's (1980's, that is). I kept it simple and let the clean lines and flowing fabric speak for themselves. Plus, this way if I can find something natural and appropriate later on I can replace the trim with as little fuss as possible.


I utilized the same trim treatment on the sleeves, hem of skirt, collar, and cutaway neckline. I added two rows of pintucks above the bottom trim treatment for two reasons:

Collar and Cutaway Trim
          1. It looked a little like it needed something else, but nothing crazy. Pintucks are a great way to add some texture without being too much.
          2. Pintucks also add some structural support to the hemline by making it slightly stiffer and help the skirts to hold their shape.

The pintucks worked wonders. I don't have the pictures uploaded yet, but the skirt holds its shape so much better now.


End Result

Back View prior to
bodice alteration
I'm not going to lie, the turn of the century is not my favorite time period. The Belle Epoch and Edwardian fashions, to me, are not the most flattering for my figure (fairly curvy) and out of the 19th century I would have to say that I am madly in love with both bustle periods.... however... 

I think I love it! I cannot believe I'm saying this, but it makes me feel like a princess. It's so light and airy. The fabric is so fine and soft and when I walk I can feel it floating behind me like a cloud. The hubby saw it and said that it reminds him of wedding dress (common response actually- I think because it's all white.) But it does make you feel pretty. 

 And the best part: it has only taken two days of working into the wee hours (so far) to construct. I should have the finishing touches on by tomorrow and it will be ready for volunteering on Saturday, and should make for a much cooler summer season.
Side View- ignore the
sewing mess and iron
cord hanging off the
ironing table- lol.


The down side? As Eva (dog #3) has so evidently made clear today- it's white. I've had to wipe off two muddy nose spots so far, which luckily did not stain. 

Note to self:  Investigate wholesale supply of tide pens...

Thursday, March 31, 2011

It has begun... now how long will it last?

So, I've tried blogging before, and have had various amounts of success, when the Thimble (my usual partner in crime- best friend and the ever more practical and all around better half to the living history whole) recommended that maybe I would have more success writing about my passion: historical fashion, etc.

The husband seconded this motion, and so here I sit with a sewing room full of pieces calling my name. I'm not one to usually follow the progression of my creations, so I think this will be an interesting experiment.

Well, let's just get this out there. I am a historical fashion lover and a living history nut. By lover I mean fanatic. By fanatic I mean it's an illness really. There should probably be medication or a place where they put people like me... (I prefer to think of it as a really nice, big, workshop with lots and lots of period correct fabric, books, and museum pieces to reference...). I am in love with authenticity and if I had no other tasks to perform in my life I would sew everything by hand in natural daylight in authentic reproduction clothing (so some of my associates may think I'm crazy, but I love it!). However, due to lack of time and the pressing need for clothing, sometimes I stray: I admit that I do use a modern sewing machine for lots of things (inside seams, occasional blind hems, stay channels). I do own an 1886 pedal machine, but need to repair a belt so that I can use it to make my post 1886 garments.

I am a stickler for natural fibers. While this makes it difficult for me to shop at the local fabric store, I do find a lot of really good sources for all natural fibers comparable to their historical counterparts through specialty retailers and the internet. Trim, however, is always a challenge. And don't even get me started on lace. Uhg! I certainly do not know everything, but love learning new stuff. I dig primary sources the most. They rock my world.

Anyhow, it's all part of who I am and what I love. So I thought I might put some of that our there for other people like me. I mean, I'm not the only one, right?

Anyone?