Monday, February 3, 2014

When Patience Pays Off (or I've been waiting two years for this book!)

Woohoo! I'm so very tired this evening after a wonderful weekend at MHF (event in review to come soon) but I couldn't help posting about my excitement as I've been anticipating this text for some two years now!

Wearable Prints: History, Materials, and Mechanics finally came!

I've already spent some of my evening perusing and will post a review as soon as I've finished reading the 500 odd page tome.

Yay!

Saturday, February 1, 2014

HSF '14: Challenge #2- Innovation (or a Marseilles cloth petticoat)

If you reference my HSF '14: Challenge #1 post, you'll see that my fist attempt at a Marseilles cloth petticoat (usually called "matelasse" today) turned out less than perfect. First too long, then too short, then finally made to work by adding a printed band around the bottom.

So, for Challenge #2- Innovation, I've decided to make a more length appropriate (and all hand sewn!) petticoat. Before we get to the petti itself, let's talk about the idea behind this challenge, and why I chose to use it as an opportunity for a new Marseilles cloth petticoat.

Who doesn't want a lovely quilted petticoat, right? You get that awesome fullness of the skirts without having to wear a ba-zillion (technical term) petticoats, and it keeps you toasty warm when it's -48° Fahrenheit due to the polar vortex that has kindly visited Illinois this winter! .... but back to reality- who has the time to hand quilt a petticoat?! (Unless you are Carolyn from Rockin' the Rococo- jealous btw!)

Back to our innovation research: In the early 18th century, Marseilles was very well known for it's quilting manufacture and for good reason: Marseilles quilting is beautiful!  Marseilles quilters worked pieces in yard goods for clothing or in pieces for use in bedding. Some day I will get around to making my very own Marseilles quilting inspired hand quilted 18th century petticoat.

That day is not today.

Thankfully for me (and all of those other 18th century quilted petticoat saps) England's all about keeping it in the country; In 1760 the Society for the Encouragements of Arts, Manufactures, and Commerce in England began offering money for those who could figure out how to replicate via a loom the look of "Marseille quilting." By 1763 the first patent is registered, and it is noted in 1783 that the use of Marseilles cloth was "...so extensive...that few persons of any rank, condition, or fix......exist who do not use it in some part of their clothing."

Knowing that in the 1760's and early 70's Virginia is seeing huge amounts of cloth imported from London, and there are quite a few references between '63-76 in the Gazette regarding "Marseilles quilts" being imported, I figured that I could reasonably have a Marseilles cloth petticoat in Alexandria, VA at this time.

Now, onto the petticoat itself.

Front and side view of my Petticoat. It's very full (a little more so than I expected.)
I didn't iron it prior to the pictures, so what looks like a big seam across the
middle is actually a fold line. =P


The Challenge:  Innovation
Fabric:    2 yds Diamond quilted Matelasse (100% cotton)
Pattern:   None. Just my standard 18th century petticoat petticoat instruction.
Year:    1776-ish. Could work for a pretty good range.
Notions:       3/4" linen tape, linen thread
How historically accurate is it?  As accurate as possible (at this time). I'd like to dig a little deeper into the manufacture of Marseilles cloth sometime in the future. However, based on the research I was able to tap into via the internet and my current library collection, she's as close as I can get to what I think is right.

The petticoat is entirely hand sew in the typical manner of an 18th century petticoat. I used linen tapes to attach at the waist as the waistband, and there is a very narrow turned hem. Many quilted petticoats are hemmed by applying tape and turning to the inside, but I didn't have any I thought suitable on hand. I'll probably keep an eye out for further research and proper tape and this will be an easy fix, if need be.


Doing a spaced back stitch- that fabric is kind of thick!

Whipping the tape down to the backside. Made sure to
catch all of the pleats as I went.

Hours to complete:   6hr 20 min. Not bad considering I probably could have been more productive if I'd shut the TV off. I finished it Tuesday.
First worn:   Will be worn for the first time today, at Military History Fest. I'll update with pictures later!
Total cost:  $0.00. Everything was already in my stash. I think I got the Matelasse a long time ago on sale for $6.00 a yard or something to that extent. The linen tape I purchase by the roll to have around when needed, but probably $8 ish in tape.

If you're interested in more information on Marseilles petticoats, check out these two articles which helped me quite a bit with my research.

This article by Loren Dearborn via YWU. Unfortunately, if you do not have a membership, you will not be able to view the whole article. =/

This lovely blog post by the Ladies' Repository Museum.

If you're wondering what I consider my standard 18th. century petticoat, check out this tutorial  by the Ladies over at a Fashionable Frolick. They do some amazing work. =)


Tuesday, January 28, 2014

Military History Fest '14

After having the chance to speak at Tinker Swiss Cottage last week on Victorian Undies and my experiences wearing them, I'm back to the 18th century in preparation for Military History Fest 2014!

I am trying to get my yellow strip'd gown finished for the event, along with a russet petticoat. My gown is done but for sewing on the sleeves (and I'd like to add a cuff at some point). My petticoat is hemmed and waiting to be pleated to a tape- which I think I can get one, if not both of those things finished tonight.

I'm always excited for pre-season events like these. They get my butt in gear early in the year so that I don't slack as much on my sewing. Especially important not to slack now that I'm trying to do everything by hand. I'm a little nervous for this year's event, however, as I was asked by one of my friends to co-moderate a round table discussion on women in living history. I'll be one of a group of women moderating the discussion, so it seems like it'll be a pretty cool experience.

As always, I'm excited for the ball on Saturday night. It's always a highlight of our time at MHF.

I'll be sure to take lots of pictures while we're there and try to update when we get back. Until then! =)

Wednesday, January 22, 2014

HSF '14: Challenge #1- Make Do and Mend (or six inches too short...)

Awhile back (a long while) I decided it would be nice to have a substitute for a quilted petticoat. Without having the time (or talent, at that point) to make one, I went with the alternative of a matelasse (loom quilted cotton) under-petticoat instead.

My first wearing of said petticoat was at a summer event. A very hot summer event. To my horror, at first I cut it much too long. While sweating my life away, I made the impetuous decision to cut the petticoat (while I was wearing it, of course!) shorter so that I would be less hot and fix the length all at the same time.

Poor. Choice.

What ended up happening was I cut way too much off of the hem and ended up with a petticoat that hit just below my knees. Insert sad face here.

While at my last B&T workshop, Angela suggested I could salvage it somewhat by adding a band of printed fabric around the bottom. In Fitting and Proper, I believe there is an example of a linen petticoat with a printed linen band around the bottom. So, applying this concept to my petticoat, I got a lovely piece of the new B&T fabric in the style of some examples from The Foundling Hospital Billets and went to stitching.  Here's what I ended up with:

Finished Petticoat. I love the print on the bottom. You can see how short I actually cut it. EEK!

Close up  of the print and the attachment area.


The Challenge:  Make Do and Mend
Fabric: Cotton print / cotton matelasse 
Pattern: Just the basic petticoat pattern. No official pattern, per say.
Year: 1770-80
Notions:  Linen thread
How historically accurate is it?
While I couldn't find a matelasse petticoat with a printed cotton bind, there is reference to the linen petticoat with a printed linen band in Fitting and Proper, as well as a number of plain matelasse petticoats with heavily embroidered bottom portions that are similar in overall appearance to mine. Overall, this was a decision to make this petticoat workable until I am able to make a new one. It's strictly an under petticoat, so chances of anyone seeing it are slim to none, but at least it's the appropriate length and anything that peaks out is an appropriate (and cute!) print. The added portion was completely sewn by hand in linen thread.
Hours to complete:  About 2.
First worn: Timeline Trading Day at Midway Village Museum. January 18th, 2014. (My birthday!)
Total cost: About $10

Stay tuned for more adventures in matelasse petticoats for Challenge #2: Innovation =)

Sunday, January 12, 2014

Underestimated underwear- or the Importance of Stays

In living history, it can be really easy to underestimate our underwear. And why not? It's so easy to covet that gorgeous gown or pretty petticoat that we oftentimes forget that there are layers beneath those pieces that actually help make them so beautiful.

Many people feel like the time, effort, and/or cost of those undergarments may be too much for an individual (or moreso family!) just entering living history. Believe me, taking on a pair of stays for your second sewing project (assuming your first was your shift) can totally be intimidating and in some cases unreasonable. However, like shoes, the lack of proper underwear can detract from the overall effectiveness of your interpretation.

Which is why, as much as we may think we "don't need undergarments right now", au contraire mes amis; A set of appropriate, well made foundation garments should be a priority for the newcomer and veteran alike. If our bodies look like 21st c. bodies in "old clothes" people will key in on that right away. It not only makes our clothing look more like costumes but makes it harder to "buy in" to the idea that we are people from the past.

With the proper undergarments, even less than perfect clothing can be made to look better, because it allows for the proper silhouette. However, even the most accurate of creations will seem ill at ease without that ever significant foundation.

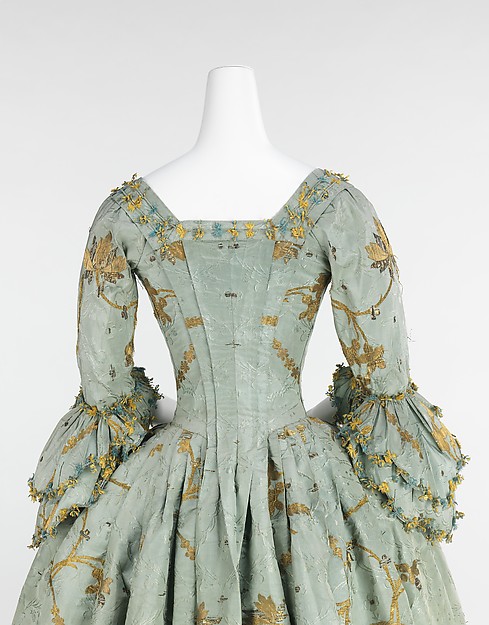
Notice the two originals below (both taken from auction sites and displayed on mannequins that are not in the correct form for the gowns.)


Compare these to an original from the Met displayed on a mannequin designed with a proper foundation and a portrait of Mrs. Daniel Sargent by John Singleton Copley.


The gowns on the proper form look nicer than the ones that are not. I grant you the difference is much more noticeable via the front than the back, but in both instances the curvature of the body is misplaced, making the gowns on the incorrect forms appear lumpy-and in all the wrong places (because, you know, there's a time and a place for lumps- just not where they appear in these two examples). Note specifically from the back view the area near the underarm and from the front view the level where the fullness of the bosom resides. 

In latter cases, the foundation provides a smooth line on which the gown can appear to advantage, rather than in the former, in which the gowns appear somewhat frumpy and less than beautiful. Now, add in poor posture (and all of our extra bits) and this effect is even more pronounced on the human body.

So, once you decide to take the plunge to vamp up your kit- I encourage you to never underestimate the importance of your underwear.


Monday, January 6, 2014

It's the Small Things...

With this wonderful advice from Angela at Burnley and Trowbridge, I've been sewing away for the last two days. Granted, it's not snowing- but it is -17 degrees out with a wind chill of -46, so practically the same thing. I practiced my hand at draping another fitted back gown for a friend (which I learned from my very first B&T workshop back in July, 2011) and I'm finishing up my "Splendid Short Sacque" from November.

I have to say, I've done seven workshops so far and every time I leave a crazy workshop weekend I feel like I've learned eighty times more than what I knew before. Honestly, every time I leave I am just plain inspired to be better; This may mean digging deeper on my research, spending more time to hand sew much needed items, and supporting and encouraging others to be better, too.

With that in mind, I've decided to start assembling a much better period sewing kit. While I've got many of the items needed for this already, I simply need to supplement here or there and/or replace some of my modern items with their period counterparts. This way, when I'm at an event and decide to sew, I don't have to worry about hiding my pin cushion or sewing box. I can simply pull out what I need and enjoy.

I start with needing some place to put my brass pins. My modern pin cushion just won't cut it, so I think my first order of business will be to make a replacement for that.  After browsing the Virginia Gazette archives and the usual online artifact haunts (V&A, Met, National Trust, etc.) I saw a few things that interested me.

First, starting in 1772, there are numerous mentions in the VA Gazette of "pincushions and lines" being "just imported" from England. There are even a couple references to gold pincushions (still pondering that one). We also see a large variety of shapes and sizes in extant pincushions. Some rounded like a ball, some rectangular with elongated corners, some hearts, etc. Most  are decorated with some sort of embroidery (fewer with beading) and made from a variety of materials.

The Sign of The Golden Scissors has a recent article regarding "pinballs" discussing the regional use of a "hoop and chain" for pincushions (the metal band around a pincushion shaped like a ball). Then there's this quick post by the Two Nerdy History Girls with a little bit about the pincushion as a ladies accessory. Finally, a post with instructions from Katherine at The Fashionable Past to get us started with an idea of how to make a pincushion (hers using the silver hoop described above.)

I'm thinking of making two pincushions for myself out of some silk and wool scraps left over from the riding habit workshop last November; The first will be in the rectangular with elongated corner style for my sewing kit and the second in a diamond, heart, or ball shape with a tape to be attached at my waist to have it handy when needed. More to come as work commences!

Saturday, October 26, 2013

Bad, bad blogger...

I admit it freely- If I were an 18th century diarist I would be a historian's nightmare. Sporadic writings, long periods of nothing at all... this is how I blog, as well. I mean to be better about it, but then I'm not. I have come to accept that I will probably never be a blogger that updates on a consistent weekly (or even monthly basis) and that's ok!

This summer, I took on a new position in my professional career. I transitioned from being a high school English teacher to becoming my high school's librarian. This means a couple of things for me: No more grading essays until 3 a.m. (hooray!) and I will need to go back to school for some master's classes in Library Media Science (also kind of cool).

While this is rather a busy time for me, I have to say that I feel somewhat energized and motivated with the change, and it is bleeding over into other aspects of my life (like my historical sewing and research). Thus, I am hoping some of that motivation will carry into my blogging.

Time will tell, dearest reader, but I hope you'll hear more from me to come.